Cheezy Valentines Heart

The Paths Palette

The Paths Palette is where you save all of your data for paths (unless of course they are clipping paths which you would alter within the Layers Palette—hey, I didn't design it, I'm just teaching it). When you draw on the image window with the Pen Tool a Work Path is automatically created. Frankly, I have never understood why it just doesn't go ahead and make a regular path layer just keep in mind the the Work Path is not saved. If you want to save the Work Path, double click the Work Path in the Paths Palette and rename it in the dialogue that appears. Remember that when you have multiple paths you can designate which path you are drawing on by making it the active path in the Paths Palette prior to laying down the anchor points.

The Paths Palette is also handy for other functions such as filling a path, stroking a path, and converting a path to a selection or vice versa (these are all available from the wing menu).

Any selected clipping path in the layers palette will also show up in the paths palette for your editing enjoyment.

Making the Feathers

Since there is no handy pre made shape for the arrow's feathers we will need to draw them by hand.

  • Create a new path layer by pressing the page icon at the bottom of the Paths Palette.
  • With this path selected use the Pen Tool to draw the arrow on the image window. I started with simple clicks to make a basic shape and then used the Convert Point Tool and the Direct Select Tool to round the feathers where I wanted.
  • After your feather looks the way you want, duplicate the path by dragging the path layer to the page icon (just as you would to duplicate a regular layer).
  • The next step is to move the copied feather path to the other side of the arrow shaft. Select the Path 1 copy layer and then flip it vertically (Edit>Transform Path>Flip Vertical). Then (with the path still selected in the paths palette) press command-T (a bounding box appears) and rotate/move the feather until you get it into the right position opposite the original feather's path.
  • Create a new layer for the next step.
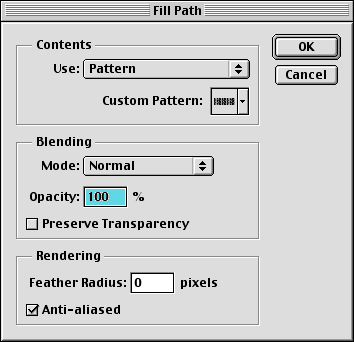
  • With the paths in the right position you can fill them by selecting the Fill Path command from the wing menu of the Paths Palette. This brings up the dialog box shown below. You can fill the selected path with a color, gradient, or pattern. There are a bunch of pre-made patterns in the custom pattern box. I chose the herring bone one (I thought it had a feathery look). I left Feather at zero (even though we are making feathers you don't want to feather the arrow's feather) and blending on Normal.
  • You can fill the other feather in the same manner (make sure to select the feather outline in the Paths Palete to make it active).