|
The Power of Masks
|
|
Complicated Selections
Complex objects like hair, fur, and plants are usually impossible to select with the the methods we used in the last lesson. For the rest of the lesson, we will use an example of a convenient way to select hair, the bad boy of all selections. Keep in mind that there are many ways to get this job done, this is just one of them. My goal is to get a good balance between quality and speed. You could literally spend hours on this mask to make it look perfect, it took me about a half hour–it's not perfect but that extra 10% improvement is not worth the extra 60-90% effort.
Initial Evaluation
The initial step in creating a mask for a complicated selection is evaluating the image and deciding how to approach it. As you know, there are a far too many ways, with corresponding tools, to select objects within an image. If the object is simple enough I usually use the tools we discussed in the previous lesson, the Magnetic Lasso Tool being one of my favorites. Although the Magnetic Lasso Tool is indeed awsome, it would be a bad choice for selecting complex objects like hair (you would be magnetically lassoing forever). If the selection looks like it would be complicated I will usually evaluate it to see if the process we will use for the rest of the lesson will work on the object I need to select from the image. This process works best in images with somewhat high contrast between the object and the background. Since Meagan has naturally blonde hair, I decided that the following example would be the best route to go.
Creating the Mask
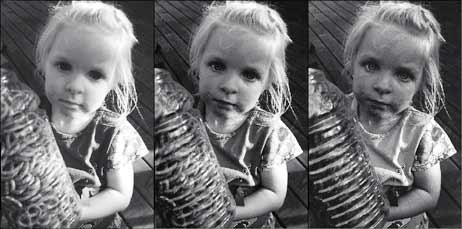
Since we only need a grayscale image for our mask we can look for more contrast in our image by going to the Channels Palette. As you can see below, each channel is slightly different and corresponds to how much red, green or blue are in the image. Look through the channels by clicking in the palette or by pressing command-1,2, or 3. Decide which one has the most contrast (I chose the red channel in this particular image) and duplicate it by dragging it down to the new layer icon at the bottom of the palette. Keep in mind that creating new channels like this does nothing to the original image, it is just a handy way of storing saved masks (which this new channel will eventually turn into).
|
|

red, green and blue channels
|
|
|
|
