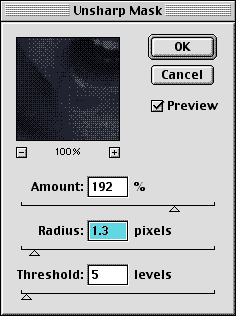
One of the niftiest filters in Photoshop is the Unsharp Mask filter (Filter>Sharpen>Unsharp Mask). Scanning introduces a slight blur to an image and the Unsharp Mask filter magically sharpens the image back to the way it was.
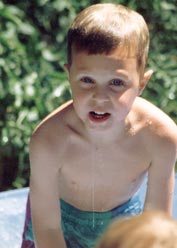
The filter works by identifying "edge" pixels in an image and increases the contrast along that edge. The threshold setting determines how different in contrast the pixels must be in order to be called "edge" pixels. A threshold of 0 essentially makes all pixels "edge" pixels and sharpens everything, which introduces a lot of noise. A threshold over 20 usually ends up not sharpening anything. I usually keep the threshold below 10 and adjust it until I can see the major lines (such as the eyes, shoulders, hair in this picture) begin to sharpen.
The radius setting determines the width of the area that will be sharpened. The rule of thumb is that the radius should be set one-half of the dpi setting of the image. If the image is 300 dpi, set the radius to 1.5, 150 dpi is set to 0.75, etc. I find that it is a good general rule but that there will always be some adjustments to that. This image was a 150 dpi initially, I started out with a radius of 1 pixel but needed a bit thicker sharpening and increased it to taste.
The amount slider sets the strength of the sharpening. I usually start with this at about 200% and adjust it last after setting the other parameters.