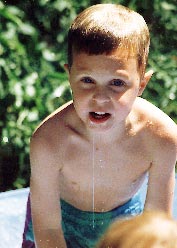
As I mentioned before, I like a lot of color in my image, fortunately the Overlay Mode trick adds just the right touch of extra color in just the right way.
combine all of the layers in the image by selecting the wing menu on the layers palette and choosing Flatten Image.
press command-shift-S (File>Save As) and rename the picture to something memorable, this way you don't lose all of the work you did before flattening the image.
duplicate the flattened image by dragging the layer in the layers pallet onto the new layer icon at the bottom of the palette.
Now you have two copies of the same image. The next step is to use the blending modes to help add more color. Blending modes allow you to specify how one layer interacts with the other layers below it. Some of the modes lighten the image, some darken, some make the imaged funky. There's a lot you can do with them and I'll bore you with the details later.
select the top layer
change the blending mode from Normal to Overlay (this is done in the pop-up menu at the top of the layers palette).
As you can see, the brightness, contrast and saturation of our already excellent image has been improved even more, but perhaps a bit too much.
use the opacity slider to fade the image to a more acceptable level.